Crossy Road - Page 1
|
|


Let's Make a Video Game!
In this unit of study, we'll be building our own Frogger-style video game.
In this unit, we'll cover:
|
Replace the Cat with a Frog and edit its Costume - Vid1
|
|
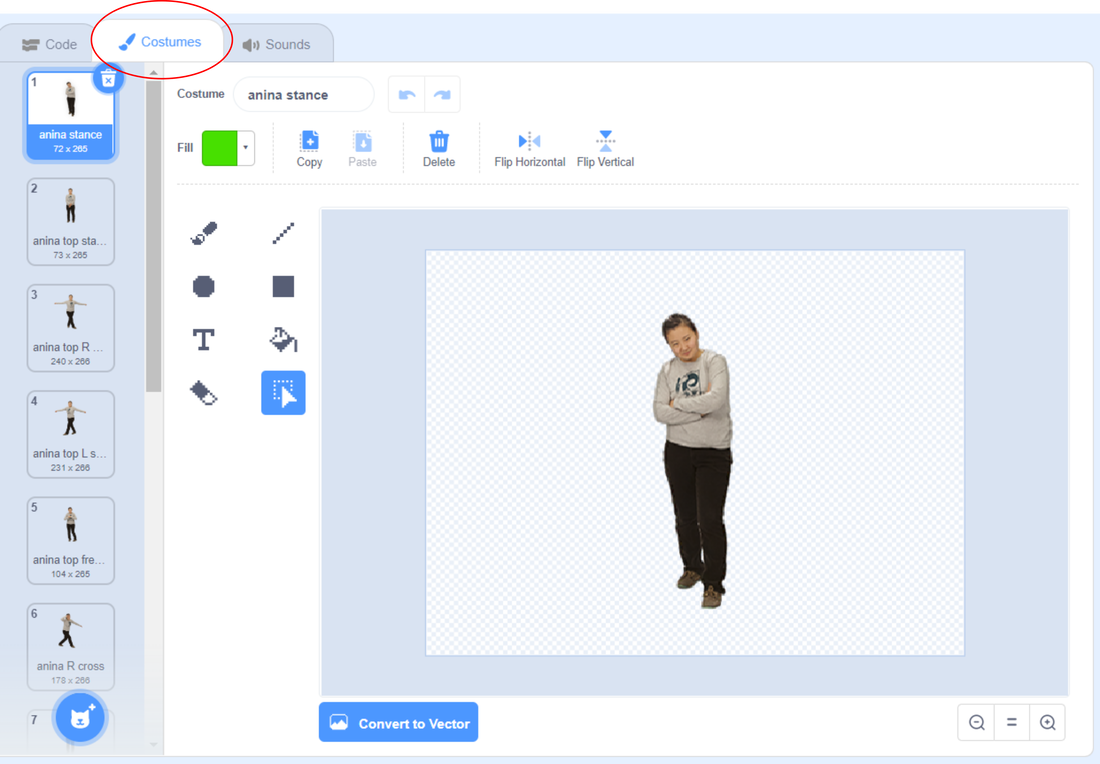
About Costumes and Graphics in Scratch
|
Scratch has 2 very different graphics editors for drawing and editing sprites:
Vector Toolbar (Edit by objects) This is very different so if you are not used to vectors, try the Inkscape lessons by Mr. Rich. Mr. Rich recommends using these cartoon drawings that are called "Vector Graphics". They are easier to edit and recolour. Also, do NOT use the eraser. Instead select the part and then click the "Delete" or "Backspace" keys on your keyboard. (This is how Mr. Rich deleted the frog's tongue in the first video.) |
|
|
Bitmap Toolbar (Edit by pixels)
The other graphics editor uses photographs or pixel graphics that look like photographs and are edited using "Raster Graphics". |
|
DEFINITION of "SPRITE"
|
A Sprite is an object in Scratch. You can add pre-made sprites or draw one yourself!
Each Sprite has 3 tabs: - Code: This is where you drag-and-drop the code for your scripts. |
|
- Costume: This is where you draw and edit your object. You can have many costumes!
- Sound: This is where you add sounds that you want to use with this Sprite.
- Sound: This is where you add sounds that you want to use with this Sprite.
WARNING about SPRITES !!!
The code that you create is attached to whatever specific sprite you are using when you create the code. Therefore, IF YOU DELETE a Sprite, then all of that code is also deleted. You've been warned!
Get the Frog moving - Vid2
|
We are going to build our Frogger video game will only accept input from the arrow keys on the keyboard.
So, after we remove the cat and get a frog (or other animal), then what? First, get the right blocks: if a key is pressed then change the frog's location And those pieces look like this: 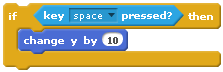 |
|
|
Now, you have the building blocks,
so change the settings that: if the up arrow key is pressed then move the frog up by 3 Can you create this code on your own? (See solution images posted to the right.) |
SOLUTION #1
Click image to see solution
with speed of 3. |
SOLUTION #2
Click image to see solution
with speed of 10. |
Common Problem
"I clicked the green flag and then nothing happened!"
Answer: Did you press the arrow key on your keyboard? Remember: Your script is waiting for you to press an arrow key (Up, Down, Right or Left). |
Make all 4 Arrow Keys Work - Vid3Here's a video showing how to get the solution.
Here's a video showing how to get the solution.
|
Edit the STAGE to Create Lanes for the Killer Cars - Vid4a
|
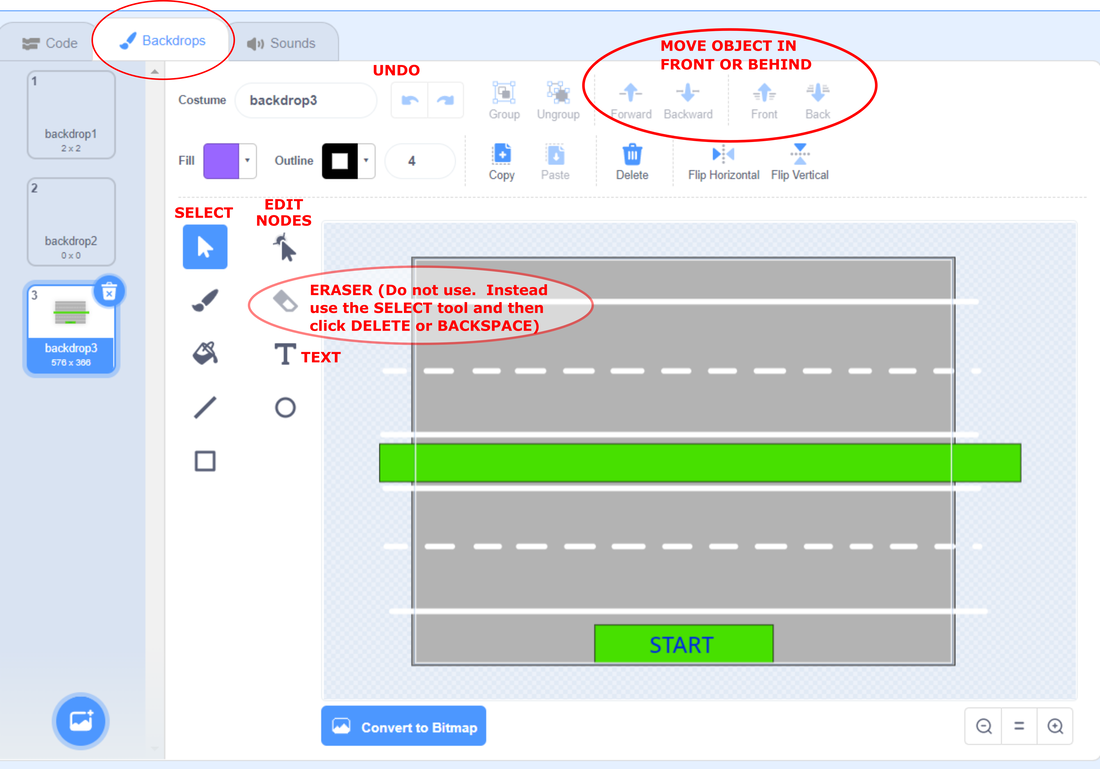
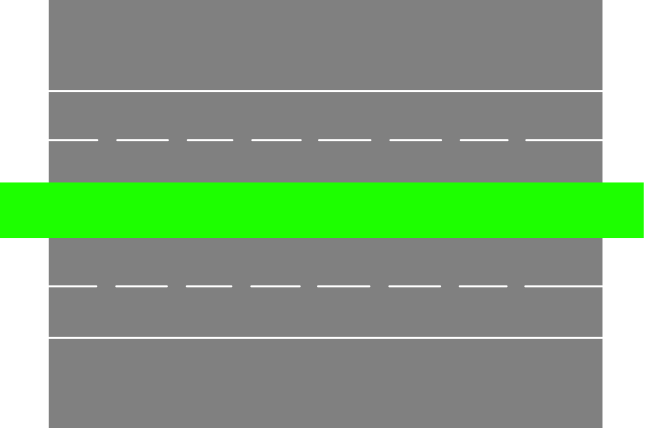
To begin, we need to create a road with 4 lanes,
- 2 lanes where cars and trucks go left and 2 lanes where cars and trucks go right. To do this, let's click on the STAGE and then edit the BACKDROP (where the Costume tab used to be). You will want to start by creating a grey rectangle for the road and then a green rectangle for the safe area where the frog can stop halfway (where no killer cars will be). We can add sprites to make artwork in the green area later. For now, let's keep it simple. We do want to add lanes to the road, just to make it easier to see where cars and trucks should be lined up. |
|
Add new Sprites for Start and Finish Areas - Vid4b
|
To create start and finish areas, let's create some new SPRITES (like the cat and the frog). We will start with the add new sprite button here, and click on the paint brush to go directly into the Costume area and start drawing a START and FINISH area.
For most Crossy Road games, Start is usually at the bottom and Finish is usually at the top. For us, we want to keep it simple and just draw rectangles, but feel free to make your Start and Finish areas more interesting later. Art work is important! |
|
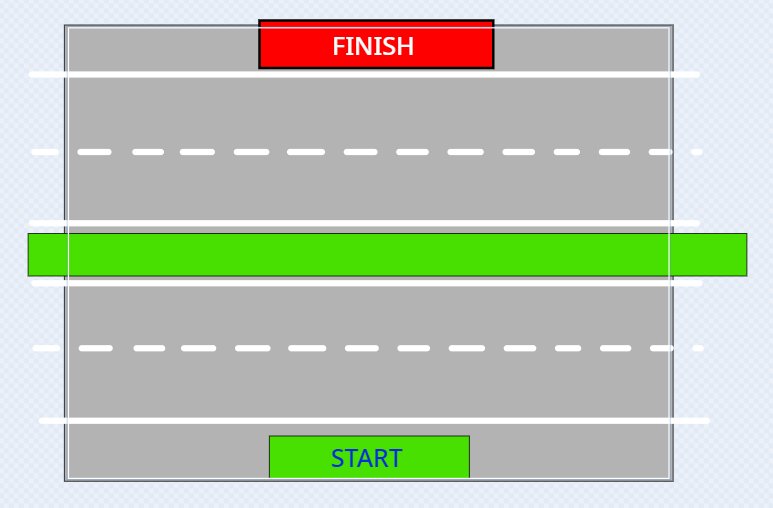
Frog Starts at Start-Vid5
|
At the beginning of each game, the frog should be at the START position.
And since that won't happen automatically, we have to code it! You'll need to use a GLIDE code block. Here's a sample, but where should it be added? 
|
|
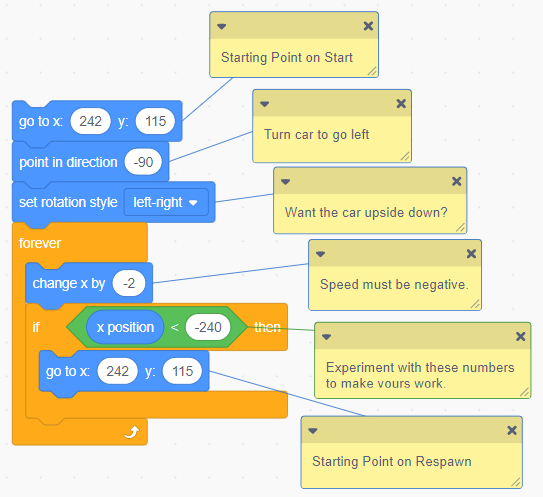
Create a Moving Car (But it won't kill the frog just yet) - Vid6a
To make a car move, we use the same basic structure as when we wanted the cat to bounce around inside the fence.
However, in this case, we have highway lanes that are perfectly horizontal. So, to make sure that the cars stay in their lanes, instead of "moving 10 steps", we're going to just "change x by 10". (We will actually slow it down to 2, 3 or 4 so that new player can start slowly and succeed... so they will want to play more!)
However, in this case, we have highway lanes that are perfectly horizontal. So, to make sure that the cars stay in their lanes, instead of "moving 10 steps", we're going to just "change x by 10". (We will actually slow it down to 2, 3 or 4 so that new player can start slowly and succeed... so they will want to play more!)
|
Trust me, this will keep everything nice and orderly!
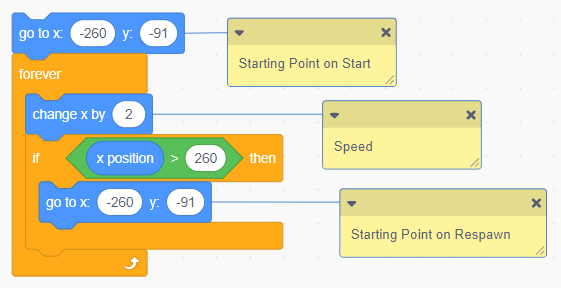
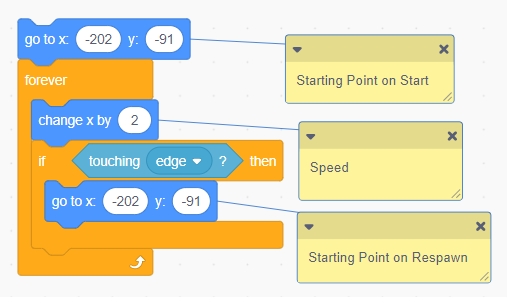
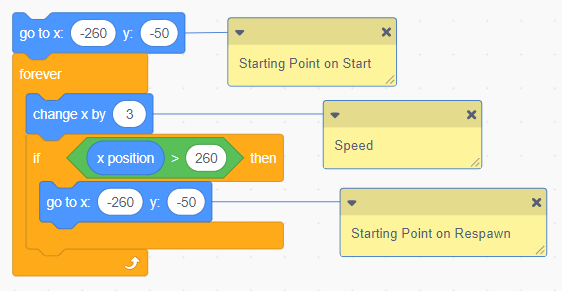
NEAT TRICK: Rather than making hundreds of cars, we're going to re-use our car so that (for now) only one car travels in each lane. To do this, we're going to make our car drive across the video game screen, and then "teleport" back to the beginning of the lane. Watch this video to get the idea. When you're done, you should have a car object in your list of sprites, like this: 
|
And in your car object, you should have code like one of these.
You will need to change your X values to match your code. (Mine is -202 for both Start and Respawn in the image below.) I recommend moving your vehicle so the back bumper is almost touching the edge, and then using whatever X values are there.
|
Common Problem
Adding a second car is not as easy as it sounds.
If you want to try it now, go ahead! We will teach you that later on. |
Part 1 - Set the Car to Kill the Frog - Vid7
|
Sadly, in a video game called "Frogger", the whole point is to see how long the frog lasts before it dies.
In this video, we set the car to send a message ("FrogIsAlive") to the frog. We use a Data Variable, and a code blocks that look like this. But where do they go? 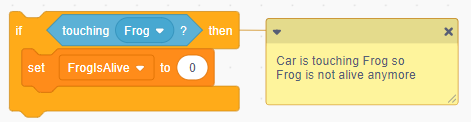
We want this code above to go into every killer vehicle (or whatever you have that will kill the frog).
So now your killer vehicle code should look something like this. WARNING: The Frog doesn't actually die ... yetSo we have created the code for the killer car to set a variable that the frog is dead. However, the frog doesn't know it yet. So, in the next video, we have to get the frog to listen to the FrogIsAlive variable to see if the frog is alive or not.
WARNING: The Frog doesn't come back to life ... yetSo far, we only have the frog die when it touches a car.
|
Click for larger image
|
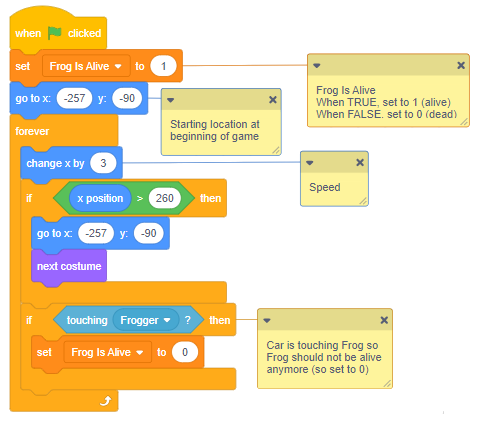
Part 2 - Kill the Frog! - Vid8
WARNING! Your Frog will die and NOT come back to life.
|
|
|
So, here's a list of all the things that need to happen so the frog can die and come back to life again.
In the Car:
|
Code for the Car. -- Click for larger image
|
|
In the Frog:
In our next video, we will find all the things that are going wrong and fix them. This is definitely not done. |
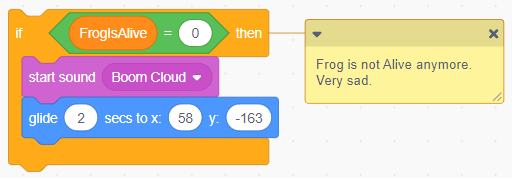
Code for the Frog. It's wrong but an important first step. -- Click for larger image.
|
Part 3 - Bring the Frog back to LIFE! - Vid9
|
Let's bring the Frog back to life. We need to do this in the code for the Frog.
First, let's have some fun and add a sound effect for when the Frog dies. And this is how we discover our first problem: the frog is dead but still somehow alive and keeps gliding back to the start and the sound effect keeps playing. |
|
To fix this, we need an "IF ELSE" code block AND we need the IF part to check if the Frog is dead and the ELSE part to have all the keyboard arrow movement code.
|
In the Frog:
Options:
|
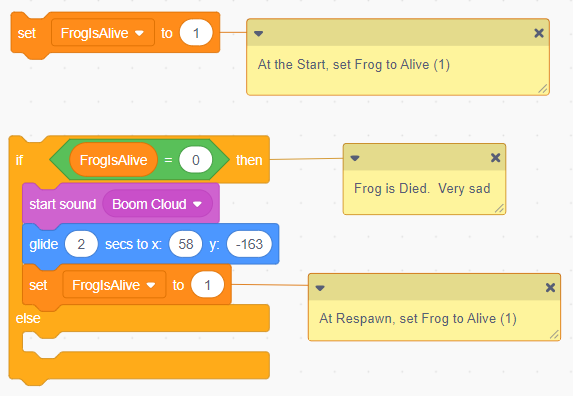
Better code but still not done. -- Click for larger image
|
Vid10 - Discontinued
Duplicating a Car in the other Lane (same direction) - Vid11
|
When you want to create more cars, you need to fix the code with each car, otherwise they will just overlap with each other.
Here's my sample Basic code but your numbers will be different. 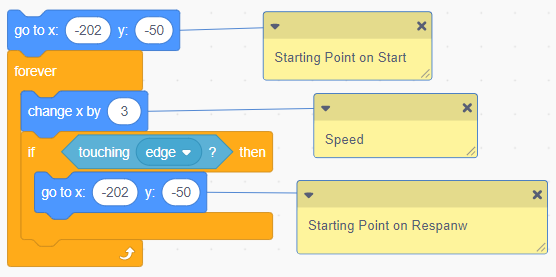
Basic Code -- Click for larger image
|
|
Duplicate More Cars but Moving in the Other Direction - Vid12
|
Ready to move your cars in the other direction?
What's the secret? - Remember with the arrows that up was a positive direction but down was a negative direction? Well, it's the same with our speed! We use the same logic. Here's my sample Basic code but your numbers will be different. 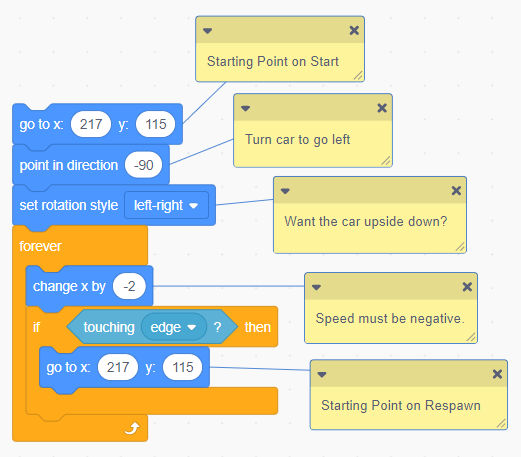
Basic Code -- Click for larger image
|
|