Witty.ca - Mr. Rich's Professional Archives

  • Home
  • Courses
    • Course Listing & Updates
    • HCS Archive 2015-2016 >
      • HCS'15 Media Studies 120
      • HCS'15 Nutrition for Healthy Living 120
      • HCS'15 Visual Art 9
      • HCS'16 Intro to Electronics 110 >
        • Purchasing a Computer in 2016 >
          • HCS'15 Visual Art 110/120
      • HCS'16 Housing & Design 120
      • HCS'16 Visual Arts 10
      • HCS Winter Decoration Ideas
    • HCS Archive 2014-2015 >
      • HCS'15 - Digital Production 12
      • HCS'15 - Graphic Art & Design 11
      • HCS'15 - Media Studies 12
      • HCS'15 - Visual Art 10
      • HCS'14 - BBT 10
      • HCS'14 - Info Tech 11/12
      • HCS'14 - Visual Art 9
      • HCS'14 - Visual Art 11/12
      • HCS Art Club
      • HCS Announcement Text
    • HCS Archive 2013-2014 >
      • HCS'14 - English 12
      • HCS'14 - Graphic Design 11
      • HCS'14 - Individual & Family Dynamics 12
      • HCS'14 - Info Tech 12
      • HCS'14 - Social Studies 8
    • Student Introduction Form
  • Tech Units
    • Safety & Citizenship >
      • Work Place Safety
      • Digital Safety & Citizenship
      • Digital Communication
      • Digital Rights & Responsibilities
      • Digital Etiquette
      • Digital Wellness
      • Digital Business
      • Digital Access
      • Digital Literacy
      • Digital Law
    • Audio / Video >
      • Sound (Audacity)
      • Video (One Minute PSA)
      • Make a Movie Trailer
      • Blender Video Editor - Test
    • Automotive >
      • Auto - Careers
      • Auto - Engines
      • Auto - 4-Stroke vs 2-Stroke
    • Raster Graphics >
      • How to Submit - Raster Graphics
      • Photoshop Activities
      • GIMP Overview
      • GIMP Install & Setup
      • GIMP Activity 1
      • GIMP Activity 2
      • GIMP Activity 3
      • GIMP Activity 4a
      • GIMP Activity 4b
      • GIMP Activity 6a
      • GIMP Activity 6b
      • GIMP Activity 6c
      • GIMP Activity 6d
      • GIMP Activity 6e/f
      • RG Final Project - Magazine Cover >
        • HCS'16 Graphic Art & Design 110
      • RG Final Project - Cereal
      • RG Marking Breakdown
    • Vector Graphics >
      • Inkscape Act.1
      • Inkscape Act.2
      • Inkscape Act.3
      • Inkscape Act.4
      • Inkscape Act.5
      • Inkscape Act.6
      • Inkscape Challenge
    • Coding - Teacher Start
    • Python (Coding) >
      • Python - CS 110 PD - July 2016
      • Python - CS 110 PD Part 2 (Projects)
      • Python - CS 110 PD Part 3 (GUI)
      • Install Python 3.5 + PyGame
    • Scratch 2 (Coding) >
      • Scratch 2 - Introduction to Coding
      • Scratch 2 - How to
      • Scratch 2 - Introduction
      • Scratch 2 - Frogger (p1)
      • Scratch 2 - Frogger (p2)
      • Scratch 2 - Frogger (p3)
      • Scratch 2 - Frogger (p4)
      • Scratch 2 - Frogger (p5)
      • Scratch 2 - A 2nd Project
      • Scratch 2 - Teacher Notes
      • Scratch 2 - Choosing another language
    • Scratch 1 (Coding) >
      • Scratch (Scripts 1 & 2)
      • Scratch (Script 3)
      • Scratch (Frogger)
      • Scratch (Frogger 2)
      • Scratch (Frogger 3)
      • Scratch (Frogger 4)
      • Scratch Mini-Challenge 1
      • Scratch Final Project
      • Notes for Teachers >
        • Teaching Scratch
    • Design (AutoCAD) >
      • Design Act. 1
      • Design Act. 2
      • Design Act. 3
      • Design Act. 4
      • Design Act. 5
      • Design Act. 5b and 5c
      • Design Act. 6
      • Design Act. 7
      • Design Act. 8
      • Design Act. 9
      • Design Act. 10
      • Design Act. 11
      • Design Act. 12
    • Design (Sketchup) >
      • Sketchup House Setup
    • Portable Apps >
      • Cam Studio
      • Virtual Dub
      • Scratch (and Zip File for Students)
      • TuxPaint (and Zip File for Students)
      • TuxTyping (and Zip File for Students)
      • Google Chrome
    • Project Management >
      • Intro to Project Mgmt.
      • Assignment for Project Management
    • Final Projects and Exam Review >
      • Final Project - BBT 10 - 2015
      • Final Project - Digital Production 2015
      • Final Project - Media Studies 2015
      • Exam Review 2013
    • Cybersecurity
  • Art Units
    • Elements and Principles >
      • Elements of Art
      • Principles of Design
    • Photographic Composition
    • Visual Art 9
    • Graphic Art & Design 110 >
      • Colour Theory
      • Layout
      • Fonts and Type
    • Visual Art 110
    • Previous Box Projects - Visual Art 10
  • Other Units
    • Housing >
      • How to Design a House
    • Media Studies >
      • Media Studies Handouts
      • What is media? Why study media?
      • Film, Television and Video
      • Advertising, Marketing and You
      • Media and the Internet
      • Self-Study Project
    • Nutrition >
      • Recipes >
        • Black Bean Cake and Cupcake
  • Sports
    • Volleyball >
      • NMS Volleyball 2019
      • Volleyball Contact
      • (Old) Volleyball 2017
      • (Old) Volleyball Spring 2016
      • (Old) 2016 Tournament - MS Boys Volleyball
      • (Old) Volleyball Spring 2015
      • (Old) 2015 Tournament - MS Boys Volleyball
    • Soccer >
      • (Old) Soccer Fall 2015
    • Basketball
  • Blogs
    • Computer Science Blog
    • Personal Blog
  • Contact
  • About
    • About Mr. Rich
    • About Technology and Computer Science
  • Archives
    • Teaching Software >
      • Purchasing a Computer (notes) >
        • Purchasing a Computer
        • Computer Scenarios
        • Computer Presentation
        • PAC Test Instructions
        • PAC Peer Review
        • How to Submit Computer Comparisons
        • How to Submit Computer for Helen
      • Scratch 2 (Coding)
      • Scratch 1.4 (Programming)
      • ARCHIVED - GIMP (Raster Graphics)
      • ARCHIVED - Inkscape (Vector Graphics)
      • AutoCAD (2D Design)
      • Sketchup (3D Design) >
        • Google Sketchup (2011)
        • Google Sketchup (2012)
      • Excel vs Calc (Spreadsheet)
      • Cam Studio (Screen Capture Videos)
      • TuxPaint (for young kids)
      • TuxTyping (Typing Tutor)
    • Links >
      • Career Links in Fredericton
      • Job Hunting Tips
    • Presentations >
      • Scratch Workshop Oct 11, 2013
      • Scratch Workshop Sept 18, 2013
      • Math for French Immersion
    • Software That Is No More >
      • Setup (for an older version of Weebly) >
        • Setup - Day 1
        • How To Setup Your Weebly Pages
        • Marks (link to Canvas)
        • Web Portfolio
    • Previous Teaching >
      • Old Teacher's Logs >
        • Teacher's Log 2015-2016
        • Teacher's Log 2014-2015
        • Teaching Notes - Hartland 2014
        • BBT9 Teacher's Log (Apr-June2013)
        • BBT9 Teacher's Log (Jan - Apr 2013)
        • BBT9 2012
      • Sept2010-Jan2012 >
        • Old Home
        • Middle School >
          • Literacy
          • Social Studies 6
          • Social Studies 7 >
            • Online Test - Canada at Confederation
      • Jan2012-Nov2012 >
        • Book Blog >
          • Blog to Book
        • About Mr Rich
    • PD Sessions >
      • BBT9-10 Oct6 2016
      • BBT Teachers PD (Jan 2013)
      • Cyber-bullying (May 2013)

Very sad to report that Vizwik has ceased operations (Sept '16)


Getting Started with VizWik

In this Introduction Activity, students will build a Business Card Template starting with a blank project space.

Afterwards, in the "Business Card" Activity, students will copy and edit a template that I borrowed from Martine Paquet (VizWik staff).

For both the Intro and Business Card activities, the end result may be the same.  The goal in keeping these activities so similar was to get students familiar with VizWik with some easier and repetitive tasks.  (Teachers may choose to blend these two activities together.)

If you missed the "Welcome to VizWik" video and an explanation of VizWik, they are here.

Files used in this page's activity

blueice-flickr-byjosecarlosnorte.jpg
File Size: 198 kb
File Type: jpg
Download File

youtubebutton.png
File Size: 8 kb
File Type: png
Download File

email_button.png
File Size: 2 kb
File Type: png
Download File

phone_button.png
File Size: 2 kb
File Type: png
Download File

Picture

Introduction Activity Goals

  1. Get students using VizWik quickly.
  2. Show students the correct steps to follow to get quick results.
  3. Show students how to recover from VizWik freezes. (Close & re-open Google Chrome.)
  4. Make a button act like a button.
  5. Make an image act like a button.
  6. Make multiple app pages (called "Views").
  7. Make buttons so users can go to another page ("View").
  8. Test all of this on a phone simulator for iPhone and Samsung (Android).


Getting Started - 1a


Getting Started - 1b

Creating an image that acts like a button is almost as easy as creating a button itself!  
  1. Drag your image into the white space of VizWik.
  2. Watch the Media--> Images area open and the upload arriving.
  3. From the Media--> Images area, drag the image onto your view!


VizWik "Freezes"

Sooner or later, things crash.

Watch this video to see how VizWik sometimes freezes. (It doesn't let you edit items, doesn't let you open/close scripts and views).  

So I close the entire Google Chrome window and in the next video I open Chrome again, proving that my work is saved automagically (!!!) and VizWik is fully functional again.


Getting Started - 1c

Watch Google Chrome come back with everything saved where I left it.

Make an image act like a button to go to a web page.

Create another View.

Learn how VizWik chooses the Primary View (starting page for your app).

Create Home, Previous and Next buttons to change app Views (pages).


Getting Started - 1d

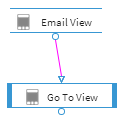
In this video, we drop Email and Phone images onto the primary view, and we make these images act like buttons to take us to the correct view (page).
  • Create a new view (page).
  • Drop the new image into VizWik's white space (and watch it appear in Media -> Images).  
  • Then, drag the image across VizWik (from Media -> Images) and into the Primary View.
  • Create a new script and name it something useful
    (like "Go to Email View")

  • In the new script, add a "Go To View" block of code.
  • Drag the symbol image of the new view into the new script. Draw a string from "Email View" to "Go To View".
  • Drag the symbol image of the new script ("Go to Email View") onto the actual envelope image in the view.
  • Your image is now a button!  Test it (but remember to refresh the phone simulator first!)


And sorry, at the end of this video, I say that I'll be back in a moment.  That was a "typo", as it was the last video of this series.  But there are more videos for VizWik here!
Picture
Picture

Next: VizWik - Business Card


Copyright © Graham Rich 2010-2016.   Site made using Weebly.com.